Saturday, December 22, 2012

Frosty the Snowman Cups


This Christmas has been a busy one. After the passing of my husband's grandfather, thanks to some helpful people at Frontier Airlines and our wonderfully supportive and understanding employers, my husband and I were able to combine our scheduled vacation with our bereavement for our trip. We have been gone a week so far and have another 5 days before we go home. I think this is the longest trip I can remember being on ever. I am grateful we were able to be out here in Kansas with my in-laws before the rest of the family got here so we could help get things ready. So much to do and so little time! Along with Christmas festivities, we are celebrating the family birthdays we have in December and January so we have 4 parties to plan...

I also got to introduce my mother-in-law and sisters-in-law to the wonders of Pinterest. Our family has always enjoyed crafts anyway, but with Pinterest we have even more ideas and projects to choose from. When my sister-in-law with her hubby and 4 kids arrived early for a surprise, we decided to have everyone make their own snowman cup to use for hot cocoa (instead of going through a million cups all weekend). The idea came from Becca's post on Blue Cricket Designs which you can find here:


The Inspiration

We decided to make it as simple and easy to clean up as possible. We took turns using one paint brush to dab pink paint on with for the snowman's cheeks and q-tips for the black paint to use for the eyes and mouth. For the kids we also gave the option of gluing on googly eyes instead of painting the eyes on. We cut out carrot noses out of felt and glued them on. I was in the middle of making a snowflake wreath (more to come on that project later) so I hot glued mine on. The family let their creativity run wild so we also used jingle bell noses and my niece turned hers into a Rudolph cup instead of a snowman. :) Super simple, fun, and festive project that I highly recommend to keep little and big hands alike busy. I have included some of my favorite shots below- please excuse the lighting in the first shot- I didn't realize the white balance was set incorrectly and am not home yet with my Photoshop to fix it... Still fun though :D


This one is mine :)
The Rudolph Cup

Tuesday, December 11, 2012

Kitchen Cabinet Makeover

Kitchen Cabinet Makeover

 Sorry for the late post everyone. We had a lot going on this weekend and my hubby's Grandpa passed away this morning so things have been pretty crazy. I am very grateful for my knowledge of the gospel and how families can be together forever. I know Grandpa is in a better place now and we will see him again someday. Happy Holidays everyone!

The Inspiration

 Like many of you I am sure, I love Pinterest. I see all of the cute homes and craft projects on people's boards and it inspires me to want to beautify my own. Thankfully, I have a husband who is really good with home makeover projects. When we first moved into our house, almost the whole place was covered in various shades of yellow, with the exception of my kitchen which was bright red. I felt like my house would be some circus clown's dream... Lol. It may have worked for the prior owners, but it was just not our style so we decided to do something about it. We painted the walls with neutral shades, tore out the massive, awkward, ugly yellow built in that was on the back wall in our family room, and tiled the floor where it used to be.

We didn't do many projects after that for a while, but this summer we decided to make over our kitchen. I am sooooooo very glad that we did. I dream of a nice big kitchen with granite or quartz countertops, a tiled backsplash, and tons of storage for all of the random cooking appliances, toys, and gadgets we have collected over the years.... and we have a lot of them. Seriously, who really needs a dippin dots maker, cake pops pans, and a cotton candy machine???? While I don't have my dream kitchen just yet, my kitchen is now much more modern and much more me! Here is how we did it. :


To be honest, I did the research to find the best way to do it and my fabulous hubby did most of the actual refinishing. Brady and I love the look of espresso cabinets but our little kitchen does not get a lot of natural light and we were afraid that refinishing them all in a deeper shade would make the kitchen seem too dark. As a solution, I was inspired by this kitchen that I found on Shannon Berrey's Design Blog here with the top cabinets finished in white and the bottom in a brown shade. I still have not convinced my hubby to let me do the backsplash or stone treatment on the kitchen island... yet. :) Someday I am sure though.

Dream Kitchen


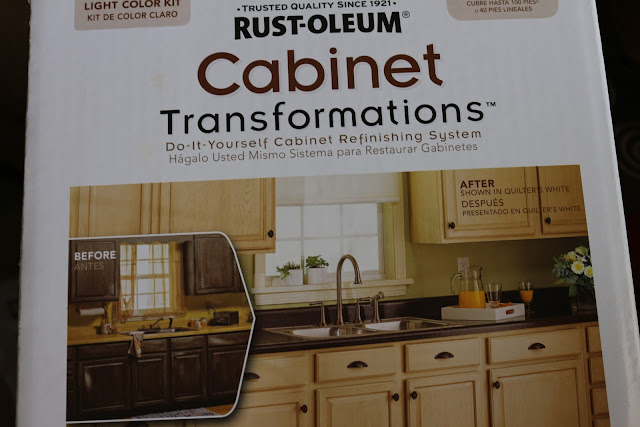
The product we used to make over the cabinets was Rust-Oleum Cabinet Transformations. We used two kits: one light and one dark. For the top cabinets, we used the white shade, unglazed, and for the bottom cabinets we used the espresso shade and applied the decorative glaze. You can view the full range of shades available here.The kit comes with pretty clear directions, so I will just give an overview of what we did and how it worked instead of the step-by-step tutorial.

The Transformation Kit


The Process

We started by removing the drawers from our island and doors from the cabinets along with the hardware then thoroughly cleaned and degreased them so the stain would adhere properly. Then we taped around the drawer fronts so we didn't get stain everywhere.


 This picture below looks pretty cluttered visually, but I have to say it makes me laugh as you can see what I am talking about for our random kitchen gadgets. We were able to leave most of the stuff in the cabinets as long as it wasn't too close to the front. In this picture of the island you can see we have my baking pans, slow cooker, electric roaster, ice cream sandwich molds, and the George Forman G5 griddle/grill, waffle iron/panini press. An that doesn't include everything we have stuffed on top of the cabinets in those fabric bins you can see above or stored under the stairs in what we jokingly call our "Harry Potter Closet."


Then it was time to stain. We did the bottom cabinets first. We started with the cabinet bases then did the doors and drawer fronts. I am including the pictures for this part instead of the top as they are easier to see the difference. Below you can see the difference in color! For the dark bottom cabinets, we did two coats of the color and then added a coat of the decorative glaze. For the top cabinets, we tried adding the glaze from the light kit but discovered that the antique white shade we saw on the box swatches really translated into cabinets that looked white but just really, really dirty. We weren't so fond of that, so we decided to do another coat of the white over it instead....


 Here is the finished product!


The bottom cabinets look stained and glazed, whereas the top ones look basically painted. Not quite what we expected, but we still like them. It definitely lightens up our kitchen and makes it feel so much more welcoming and fun. I definitely recommend this product for the darker shades in particular. The lighting in our kitchen is awful so I know the bottom shade looks black in these photos, but in normal lighting the shade looks more of a dark chocolate shade.


                                                   What do you think?  


Saturday, December 1, 2012

Thumbtack Mini Clothespins

This week has been an interesting one. I am still recovering from our amazing trip to Georgia for Thanksgiving this year. We had a blast going back to Atlanta to visit with family and friends.

It was nice to relax back home, but to be honest now that we are back in Arizona, I have had trouble getting back into my usual routine. The fact that we have another trip coming up in less than 3 weeks to spend time with my hubby's family for Christmas in Kansas doesn't really help much with the whole routine part anyway....

So this week I have been trying to decide what this week's craft would be. My bulletin board from last week's project is now adding a touch of privacy and color to my desk at work, but I have not yet gotten around to actually pinning anything to it yet. That's probably because I forgot to bring my push pins to work.... so I decided this week's craft should probably be the clothespin thumbtack project I have planned on getting around to for a while now. 

Do you ever have certain pictures or documents that you want to pin up but you don't want to poke holes in? I know I do in case I want to scrapbook those photos later. This is the perfect solution. These custom clothespin thumbtacks are super easy to make and there are a million different things you can do with them. 

I will confess... I hate throwing away scrap paper. I always think, "Oh I am sure I can find a way to use this for a different project," but then that usually doesn't happen. Well, I decided today was the day it should! :) 

For this project, you will need some mini clothespins, thumbtacks, a hot glue gun, hot glue sticks, modge podge, a paintbrush, patterned paper, and scissors. Scrap paper is perfect. I picked some striped paper that would be easy to size to fit on the clothespins initially and also some green polka dotted paper. 


I started by measuring how wide the paper needed to be and cutting off a strip the width of the clothespin. Then I used the modge podge to glue the strip to one side of the clothespin.

I folded the strip at the edge of the clothespin and cut off the excess.


Gotta Love Modge Podge!
 
 I brushed Modge Podge over the top of the paper to seal it and make the pin more durable as well.

 I added a dot of hot glue to the back of the clothespin and then applied the thumbtack.
 A trick here is to try and apply the thumbtack so that the edge is about level with the metal part on the lower part of the clothespin. That way, whatever you decide to hang will cover up the little bit of the thumbtack that may stick out on the sides.


I made a few for now and am contemplating making more but covering the side in glitter instead of applying paper or leaving off the thumbtacks and instead stringing some embroidery floss as the "clothesline" to pin things to.


Here's the finished product! I also have to say on a side note that this is one of my favorite pictures of my nieces. This captures their sweet and silly personalities perfectly. What do y'all think? If anyone decides to make these, I would love to see what your projects end up looking like.


Sunday, November 25, 2012

Bulletin Board Make-over

Recently at work, we went through one of our many inter-office moves, or game of "musical cubicles" as I like to call them... Working in a call center it can get really noisy and also very distracting. I wanted to find ways to decorate my workspace since I spend so much time there while simultaneously reducing extra noise and distractions. The solution I came up with was an extra-large bulletin board. Not just any bulletin board though, as I find plain cork boards to be a bit dull. My latest obsession has been chevron patterns. I used the tutorial I found on Live Creating Yourself and drew inspiration from Emily's Pinterest Challenge on Newly Wifes.

Live Creating Yourself's version


Emily's Creation
My steps worked out to be a little different than theirs, though the process was similar. I loved the fabric and results so much that I recovered a smaller board that I already had as well to match! Here's how I did it:


I first have to start off with a heads up for all of you iphone users/crafters. For those who may not be aware yet, Hobby Lobby now has an app you can download that includes the coupons you would otherwise have to find online and print. This has saved me a ton of money on projects such as this one since I always have my phone on my and it works great for last minute trips to the store. I got 40% off of my board and 40% off my fabric (on a separate shopping trip) for this project which always makes me smile. :)


I began by ironing and re-ironing my fabric. Doing this ahead of time made it much easier to get a smooth finish on the board instead of a wrinkled one. I then sprayed the surface of the board - excluding the frame - with spray adhesive and smoothed it down starting from the middle and working outward to the base of the frame make sure there were no wrinkles or bubbles.


Once the adhesive dried, I then added my nailhead trim. I decided to space my nailheads about a thumb's width apart for easy measuring. (Actually, for full disclosure I started with a pinky width and ran out of nailheads so I had to redo them... not so convenient. In hindsight, I would probably recommend either measuring out the perimeter and calculating the number of nailheads needed before beginning, or getting extra nailheads with the plan to just return any unopened packages after finishing). I found that I could just push them in with my fingers, but using a hammer to nail them in was actually much easier. 


   Here is where my tutorial differs from the rest... I discovered that my board must have been thinner than theirs; as when I turned the board over to attach the fabric over the frame, I found that the tips of all the nailheads stuck out. Ouch! Since I planned to carry it back to work and use my board by leaning it against the walls of my cubicle which faced another employee's workstation, that wouldn't do at all. I had to come up with a way to fix the problem. My solution: batting!
 
 
After a quick run to Walmart, I came home with some batting that I proceeded to cut into strips and glue on the backside of the frame. I overlapped them until I achieved the needed thickness that allowed me to hold the frame without stabbing myself. I then flipped over the board, sprayed the frame with adhesive, and stretched the fabric over it. Once this was done, I turned it to the back and sprayed the batting. After that I pulled the fabric taut over the batting and glued it down, folding over the edge of the fabric for a cleaner finish.


That was it! I repeated the same process for my smaller board. They are now decorating my new workspace. Next on my cubicle makeover agenda is refinishing my collage frame for photos. What are some of your favorite ways to decorate your workspace and make your day a little more comfortable and relaxing?


I love this board and fabric! Maybe I should make throw pillows with the fabric left over....


Pin It

Tuesday, August 28, 2012

Sometimes I Ask Myself Why...


My craft projects are so draining at times... sometimes I ask myself why I do what I do. With the help of my awesome hubby, I spent a good 20-24 hours this past weekend working on making handmade custom invitations for a friend's baby shower that I am throwing (well, with the help of my trusty Cricut). I will admit, I am exhausted. Part of me doesn't even want to look at a glue stick again for a year...

But then I think about how excited my friend was to see what I had come up with and how much I am excited that the final product looked like what I had imagined in my head. Any craft addict knows that one of the best parts of crafting is seeing a vision turn into reality. My other favorite part is seeing my projects make others smile. Most of my big projects have been for other people, typically my friends' baby showers.

That is what it boils down to I guess. Crafts make people happy and that is what it is all about. So when your next project seems daunting or turns out to be way more involved than you thought it would be, just think of the satisfaction you'll have when it is done and the joy it can bring to others! :)